Ok so I started my summer project the other day, in which I am challenged to produce 101 concept drawings related to "machines", "structures" and "life forms".
Having looked at other's blogs I feel I may have misinterpreted my brief and wasn't sticking solely to the objects provided on the 2 sheets. I'm trying to work methodically so I started by dividing my A1 sheet into 3 to give me a rough border to adhere too. So here goes.....
MACHINES
Overview:
Here's an overview of what I've done so far for machines. (Sorry the picture isn't great). Working from left to right, I started loosely with the 3 way port valve pump looking thingy. I got a bit carried away and just started drawing other pumps and industrial revolution era type machines, cogs, gears and valves etc. This led me to designing a marble maze type machine, so I started drawing individual parts for that. Completely ignoring my brief!! Not good! But here are some close ups.
Ok, so at this point I was sort of designing the bits and parts for this Victorian Marble machine which would all connect together. Something told me to check other people's blogs and shock horror I realised I was on the wrong tracks!
Ok so moving away from the marble machine and looking at the reference images, I started to see robot type machines out of the pumps.....
... I saw a clenched arm / elbow joint in the machine top left of this image. I enlarged the internal light bulb filament and repeated it with a bit of perspective and it took on this strange power station type feel (top right). The pump turned on it's side with the vase attached at the bottom could be a strange plant feeding machine? Or a boxing pummel ball machine?
The bloke with the head contraption was inspired by the clamps holding the old camera or light machine. ( Just a coincidence that I had my eye's tested that day, honest). The razor upside down kind of reminds me of the Burn-E character from Pixar's Wall-E, especially with the xylophone type arms.
Turned on it's side, the same machine that looked like a flexed bicep looks sort of like a drilling / oil station, especially with horizon line and little stick men on it ( top right of image). Looking at the clamps again, in a silhouette and duplicated over and over reminded me of a circuit board. (Bottom right).
The pumps duplicated and rotated look like the beginnings of an engine? ( Bottom ) Above them, part of the pump with the razor head on each side could be a generator?
So that's it so far? Like I said, I think I started off in the wrong direction but I hope it ends closer to what is asked in the brief? Phil (and anyone else), please comment away!
Next up sTrUcTuReS!
STRUCTURES
Been a while so here's an update on the structures sketches for the summer project! Have started life forms but more on that later.
I wrote down some key words that came to mind when thinking what structures are. I thought of things like buildings, bridges and tunnels etc.. All these things have some form of symmetry and repetition so I started off there...
I then tried to think of the largest structures like planets.... and the very small, like the structure of DNA.
I let my imagination go from here... tried repeating, rotating and fusing objects.....
LIFE FORMS
Only just started on these but here is what I have so far....
Odd looking creatures and maybe an ultra sound image of a baby in a womb?
Butterfly made out of the scissors, weird centrepede type thingy, cells dividing and god knows what the bottom right one is suppossed to be...?
Sticking with the insect theme...... some comical results.....
And that's pretty much it... run out of paper! Here's an overview.....
Quite weird looking at the page as a whole now after working on tiny sections at a time..... I think it's given me enough ideas to produce the A2 pieces... watch this space....
Ok, so September is rapidly approaching and thought I'd better start blogging to prove I haven't been sitting around in my pants, watching Jeremy Kyle and waiting for freshers week.... weeeeey!
I have started my Summer project, the 101 concept challenge, which I will come back to later, but first I wanted to show some of my other work and tell you a bit about myself.....
Right, so I'm returning to higher education after a reasonably successful career in sales and recruitment (yawn), but ultimately found it unfullfilling. I love films and my Education is all Art and design based so I wanted a career where I could fuse the two!
I studied with Escape Studios' online Maya tutorials from home so I could continue working part time to have some sort of social life. So I have "some" experience with Maya and set myself some projects and began to make my "showreel". I've been looking for runners positions and junior animator / modelling roles but the feedback has been pretty dismal. I got cheesed off with all the HR teams saying they get applicants with degrees in their chosen fields. So I decided to take the plunge and join you guy's and girls and further my knowledge and skills with the UCA! I'm sure you're bored of reading this now so here's some info on my work....
FIRST PROJECT
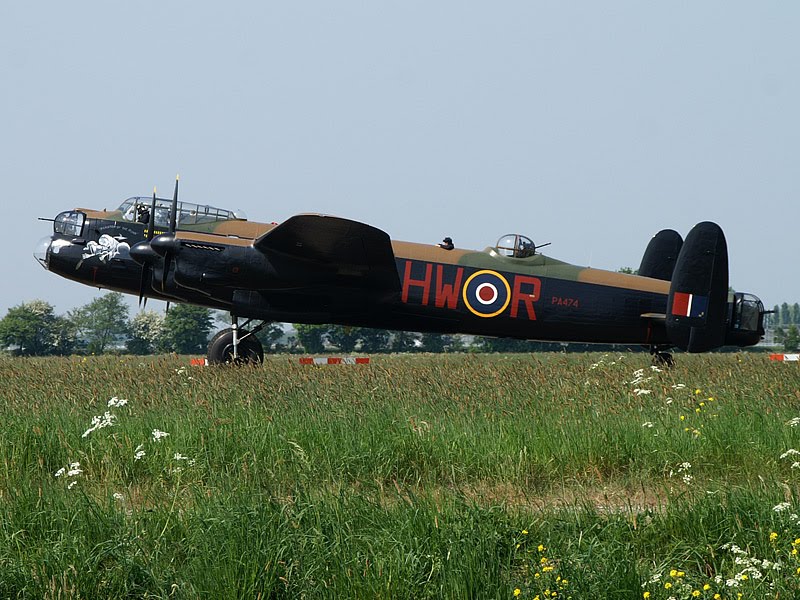
I wanted my first project to be something I would be passionate and committed about, therefore I created an Avro Lancaster bomber World War 2 plane. This is in honour of Grandad Lavey who was a rear gunner throughout the whole of World War 2 and lived to tell the tale!
Above are some reference photo's. I had loads of other material from books courtesy of my old man which helped SOOO much!
These pictures, (found on the net) were like the holy grail for my project. I used photoshop to chop and change them and produce front, side and top views. I then projected them as image planes in the front, side and top views in maya to reference when I modelled.
Here is a low res render of my finished model. I modelled it with polygons, starting with a standard sphere, deleted faces and extruded edges along the fuselage and messed around with CV's etc etc until I was happy with it.
I unwrapped the model with the UV texture editor and took snap shots of the UV map so I could work on the textures in photoshop. It involved going back and fourth in maya projecting the image planes onto the model to reference panel locations so I could create a decent map texture. They say the devil is in the detail so I did bump maps for the rivets and panels. I also created the plane "decals" with my grandad's actual squadron number!
I modelled the propellers seperately so I could animate them spinning and add a touch of motion blur. I rendered it all together with an alpha channel so I could add a background and created a basic three point lighting setup. All together I was quite pleased with it, although gun turrets are missing and there are some stretch marks due to dodgy UV mapping! There were other probs I encountered on the way and were many late nights to boot but that's a different story!
SECOND PROJECT ( & Works in progress)
Next I wanted to create and rig a simple character so I could animate and do a basic story! I started (as always) with research and started a sketch book to house my ideas and thoughts! I will upload images of this when I have a scanner.
Back in my school days I used a wooden mannequin to help me draw the human form in numerous positions and keep proportion etc, I'm sure you've seen them! I thought he would be ideal to model and rig as he was a simple character.
I kept the story basic and short and roughed out a storyboard. I did sketches first, a picture storyboard with the actual mannequin to get an idea of it's limitations and to see if it could achieve the poses I wanted. I then filmed myself and a mate with the kind of camera angles and motions I wanted. I gathered other reference images and took photos....
I modelled again in polygons and smoothed them out. I messed around with the CV's and faces / edged to get the carved look. I imported the ball from a previous Escape Studios' project as it already had squash deformers to add to the animation. I created a basic skeleton, making sure the joints were snapped to the centre of each respecting shoulder, elbow, knee joints etc. I then parented the joints to avoid skinning it, although I'm not sure if this is the best way to do it, Phil or Alan? I then created simple nurbs curves as controls, parenting them to each corresponding joint. Again Phil or Alan, not sure if this is best way to do it but it seemed to work!?
As this character was not complex..... and silent, I wanted to do a talking animation with blendshapes and a funny exert from Anchorman with Ron..... Burg-u-n-d-y...? Again, I borrowed a model from an Escape Studios' project with the blendshapes already created. I added the blendshape channels and began animating.... still needs work!!
So here is the start of my showreel with a summary of everything I've talked about.... hope you enjoy....
FIRST BIT OF REAL WORK!!
So whilst I was half way through my second project and looking for VFX work experience, I was working part time for a family run business selling thermal stores (central heating and water systems, yawn, but stick with me!). My M.D was working on a project designing a heating system for a customer and wanted to film the install for the company website. I mentioned I could, maybe, produce a short animation to go with it. We had a brief talk about what he wanted, I met the house owners and produced this short, which I'm proud to say is still on the website and can be viewed on my youtube channel....
Excuse the dodgy narration but you get the idea! Again modelled in polygons with squash deformers to jazz it up a bit. I didn't have much reference to go on except the first photo you see as the house is in Norfolk! I got the basic layout of the house from talking with the owner. Anyway, here's the finished result, hope you like!
REDISCOVERING DRAWING & PAINTING
After meeting Alan and securing my place at Rochester, he recommended I start drawing and painting again as the course is heavily focussed around 2D pre-production and visualisation, which is great!!
So to get the creative juices flowing again, I decided to do my gorgeous 8 month old niece a painting for her room. I wanted big, bright and bold colours with a friendly theme. What better than Winnie the Pooh!? I meant to take photo's step-by-step..... but forgot! Remembered half way through!! D'oh!!!!!
I was really chuffed with the end result as it had been soooo long since I picked up paint brushes and used acrylics. Throughly enjoyed it tho and my niece really appreciates it as you can see........
As I enjoyed doing it so much, I decided to treat myself to one too. As mentioned, I love movies especially superhero based comic adaps... so I found a cool image to copy and using pens and pencils, created myself an A4 poster. (Remembered to take photo's in different stages this time.)
I've done some doodles whilst bored at work too, but with limited resources, I had to rely on the good ol' post it notes and iPhone for the images!! Recognize any of them?
Ok it's 4:40am so I'm calling it a day! This blogging malarki can get addictive!! I'll do another post tomorrow with the missing sketches and add a new post with the start of my 101 concept drawings. I may need advice to make sure I'm heading in the right direction with the concept project :-/ !